Showing posts with label tutorial. Show all posts

Monday, March 1, 2010

Hair Extraction Tutorial Alert


Check out the Scrapbookgraphics blog for a comprehensive hair extraction tutorial. You know that I bookmarked that baby to try it out, too! And guess what? You can even download the photo so you can follow along in the tutorial. Check it out HERE. 7460
Share/Bookmark

Thursday, February 18, 2010

Extractions for Dummies: The Tutorial

Have you seen my scrapbook pages where I have extracted a person out of a photo and made a fantasy scene...like this one
or this one
or this one
and wanted to try it out for yourself? Now is your chance! The incredibly talented Melissa wrote a step by step tutorial showing you how to extract a person. Go ahead, try it...go check it out at the Scrapbookgraphics blog, which is found HERE. 7261
Share/Bookmark

Wednesday, November 26, 2008

Make Your Photo Look Like a Rough Painting


This is the same photograph after I applied several filters. Want to know how I did it? Keep reading for the mini tutorial.


Ok, remember the photo I showed you previously...the one with the blue cast, which I then taught you to fix? Here it is on the bottom, and then I played with some filters to make it look like a rough painting. I kind of like it, but then again, I am not an expert. There are tons of ways to do things in Photoshop, but you have to play around with it to achieve the look you want.
Want to know how I did it? Here are the steps.

I opened the photo, duplicated said photo, selected the duplicated photo layer and ran a filter.

FILTER>BLUR>SURFACE BLUR
R 15, Threshold 41

Then I ran the watercolor filter
FILTER>ARTISTIC>WATERCOLOR
Brush:4 Shadow:3 Texture:1

I also used an underpainting filter
FILTER>ARTISTIC>UNDERPAINT
Brush 4, Texture 22, Canvas, Scaling 82%, Relief 5, Top Right
I then faded the underpainting effect to 57%
(Edit>Fade>enter percentage)

(Note: I ran the watecolor filter 2 times on my photo)

And that is all there is to it. I hope you learned something new today. Have fun playing around with filters to get different effects.
Kait
2339

Share/Bookmark

Removing a Color Cast


This is my original photo (sotc) - notice the blue color cast on the photo that makes it look so drab.
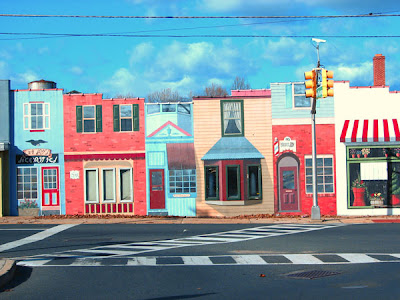

This is my photo after I removed the color cast. Notice how the colors seem brighter.
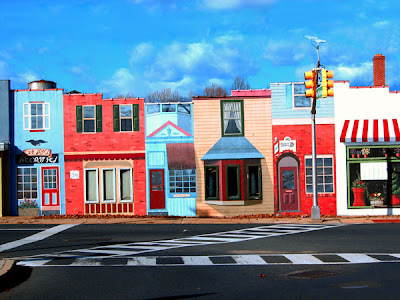
This is my final photo. Color cast removed, levels adjusted and unsightly cable wires removed. It hardly looks like the same photo, doesn't it? Here is what I did.
1. Open your photo.
2. Duplicate your photo.
Here are 2 ways to do it: (1) Drag the photo to the CREATE NEW LAYER button
(2) Select layer and press CTRL J
3. On the toolbar, go to IMAGE>ADJUSTMENTS>MATCH COLOR.
Under IMAGE OPTIONS, click on NEUTRALIZE.
If the photo looks too dull, click on the FADE slider until it starts to look good to you.
(I usually try 50 percent)
You can also adjust the COLOR INTENSITY. Play with it until you are happy with it.
4. I then created an CURVES adjustment level layer: IMAGE>ADJUSTMENT>CURVES and selected the first dropper (black adjustment) and then click on an area of the picture that had the blackest color. It automatically darkened it for me. I then clicked on the 3rd dropper (white adjustment) and again, selected an area of the photo that was white and it automatically lightened it for me. The problem is that most times this feature overcompensates by lightening or darkening too much. At this point, I tend to scrap the changes and start over by playing around with the curve anchor points until I am satisfied with the with the brightness and darkness of my photo.
I hope this helps. Have a wonderful day. Kait
2339

Share/Bookmark

Friday, July 25, 2008

Favor, Photos, Samplers, Tutorial

The sparrow that lives in my tree.


Mimosa
Thistle


The weather today is heavenly. Blue skies, a gentle breeze, low humidy, no rain.

I dropped off the kids at summer camp and went to the lake for a quick walk and photos.

I also took a few minutes to do some blog reading, but sadly, I have tons of reading to do still.
Here are some samplers I saw and liked today.
Alpha by Creashen
Leap Frog Mini by Paperplum Paperie

Pink Fusion sampler by Lindsay Jane

Fuschia by Fran

Jesica Sprague - tutorial: Fixing washed out photos/Bringing back details
http://spraguelab.squarespace.com/blog/2008/7/25/photoshop-friday-recovering-detail-in-an-overexposed-photo.html


Favor: Rachael's daughter is currently in Marine training. She is homesick. A quick note will cheer her up immensely. How about it, can you send her a quick "hang in there" note?! Tx.
An act of kindness http://www.rachaelgiallongo.com/blog/2008/07/look-at-this-crew.html


Share/Bookmark

Tuesday, July 22, 2008

Tuesday is here, hurray!

Nothing terribly exciting happening here, but at least it is not Monday.

Here are some cute stuff I saw today.

"Fabulous" kit by Krista Psst. she has a sale going on, too. Check it out.
Black and White Action / DSSA Blog
Cluster Frame by Lindsay Jane
Wordart by Bethany
Tutorial by Taylormade If you got sunspots, wrinkles, dark eyes - you'll want to see this!
Nicole has some really cute frames
Stitched alpha by Irene
Template by Tracy Psst. She has a sale going on.Check it out.
895
Share/Bookmark

Wednesday, May 28, 2008

Wednesday's Treats and a Tutorial

Wednesday's Treats...

JillJacksScraps has a multi-photo template
Sheer Blooms (flowers by Kim) - Lovely!
Shuttefly Blog - Momtourage
NBK has some "vintage" papers

Thank you ladies, for sharing your creations with us!

Angelica has a tutorial over at her blog, which shows you how to make brushes with your photos.
That is certainly a very useful tutorial. Go check it out.
Thanks Angelica for taking the time to write this up and share it with us.
Share/Bookmark

Thursday, May 22, 2008

Treats, Tricks and a Tutorial

Trick:
I saw a tutorial for aging people digitally. Wouldn't it be fun to get someone's picture under the pretense of fixing it and do the opposite?

Tutorial:
I found another one for smoothing skin.

Treats:
Scrappin A Latte: Shape Templates
Lindsay Jane - Template
Krista - Spumoni kit
Shaui has some cute doodled stars
KimB has a cute template
WordArt by Val
217
Share/Bookmark

LinkWithin

Blog Widget by LinkWithin